OK so you have managed to Name and deploy your Settlement. It’s sat there like a shiny new jewel. Now what? Well this guide is aimed at getting you started. We will cover things like Energy, Staffing and Research. These are the basics you will need to master to begin to level and make your Settlement work for you.
Lets start by adding Funds to your Settlement Bank. this should be one of the First things you do. It’s very important you ALWAYS have enough funds in your Settlement Bank account to cover its outgoings.
From your Settlement control screen click the ‘Overview‘ Button this will give you a screen like below.
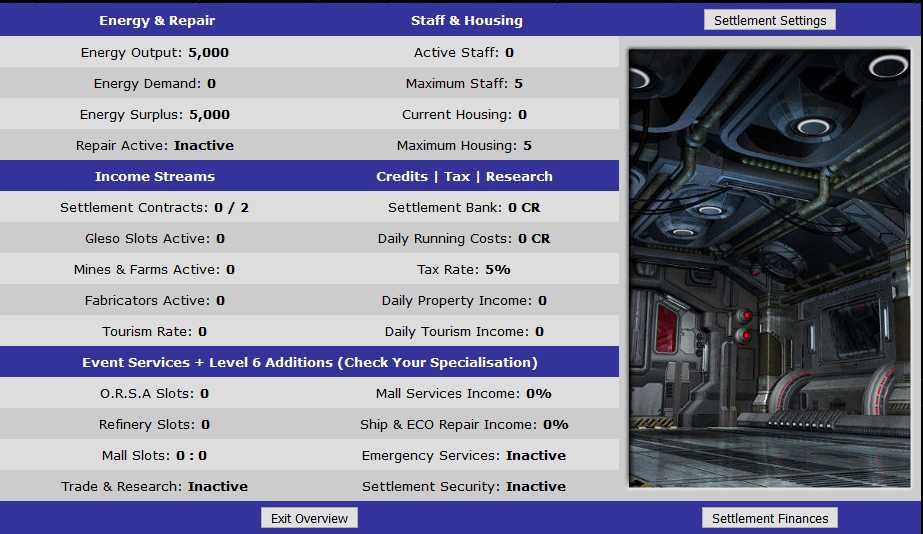
As ‘overviews’ go this one has a lot of important information you will want to familiarise yourself with. But for now I suggest we move on and click the ‘Settlement Finances‘ Button at the bottom.
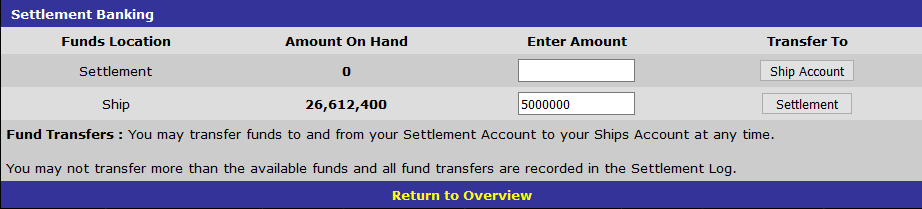
This screen enables us to Add or Remove Funds to and from our Ship and Settlement accounts. Simply enter a number (I’m placing 5 Million credits) in the lower box. We can see we have Zero in our Settlement account at this point. So I’m adding 5 Mill (no commas or periods) and pressing the ‘Settlement‘ Button.
![]()
Once we have done this we will see our Top blue Settlement info bar display the settlement funds on hand. You can see this in the image above.
OK lets move on to the first Buildings you are GOING TO NEED. Now lets cover some basics here. You are going to need to add Power sources, Housing and lastly Research. Initially you only have FIVE greens on your settlement load out. This will increase when you Hit Level 2.
But for now we have to be careful no to go crazy. I have written this guide in this fashion so that if you follow it you will level up to 2 and open a second row of slots. After that its very much up to you how you proceed.
Buildings Required

Above is a view of my Ships Settlement store tab. I have gone off and obtained. You might purchase these direct from ‘JR Galactic‘ store or you might trade with a fellow player or purchase them from a players Emporium. Either way you are going to need 2 Power Generators, 1 Housing Unit and 1 Research Laboratory.
Staffing Required
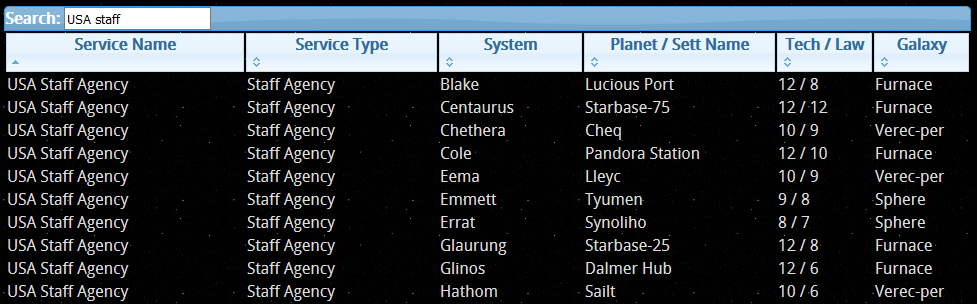
Your Staff for your settlement come from the ‘USA Staff Agency’. These are dotted all over the Universe. There is no shortage of these offices. Each one has a roster of staff waiting to be hired. When you hire staff they go on to you Employment Roster. They remain in your employ and are paid a salary regardless of if you USE them or not.
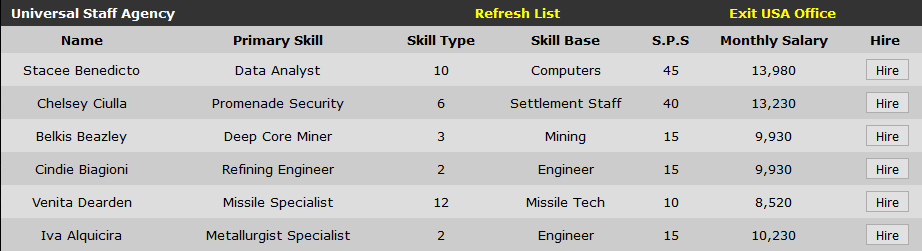
Below is an image of a typical snippet of USA staff. You can see there are a few important pieces of information.
Skill Type : There are 22 Types of crew and later as you begin to deploy more technical buildings you will find you need ‘X’ amount fo ‘Type X’ working at your settlement before you can deploy.
S.P.S : Each staff member you add to your settlement will have a SPS rating. This is his or her personal Skills rating. The object of the game is to get your SPS figures as high as possible. You will see that as you increase your SPS total figure you will start to receive a % bonus to your SRP and that’s all important for the research and development of a settlement.
Monthly Salary : The amount you will pay in total each month. Staff salaries are actually paid daily on a pro rata rate based on their monthly salary. Take Salary divide by 30 for daily rate.
I’m going to go ahead and hire TWENTY STAFF. Now this is where you could initially save yourself some set up fees. You only need 20 staff IF you want to level to settlement level 2. So feel free to hire as many or as little (Five minimum recommended). But bare in mind you WILL be returning to buy more, so you may as well grab 20 now.
I have hired Skill Type 6. These are general Settlement Staff. They normally have amid range S.P.S and are generally cheaper to hire and until we need specialised staffing will do the job.
OK so I hired 20 staff. Now lets look at the ‘View Staff‘ Option. This is a screen available through the Right Hand Button pull out tab titled ‘View Assets‘. Bring up the ‘View Staff‘ screen.
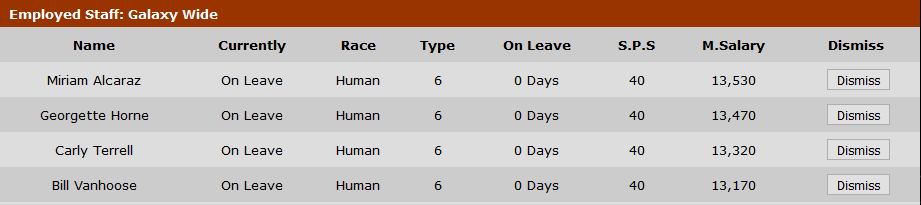
This screen allows us to see who we have working for us and where they are. Eventually you might have more than one settlement and crew on leave or deployed at various locations. This screen is a single view of them all.
It also shows near the bottom a small panel that indicates your Daily and Monthly Salaries. It also shows if you have any Alien Staff. These are required for settlements in the Expanse.

I would suggest keeping an eye on this bill. It can have a habit of creeping up on you as you hire staff left right and center. They need to be paid. Failure to do so will mean they will leave your employment.
Ready to Set up your initial Buildings
OK lets go back to our Settlement. We have collected the buildings and the staff and are ready to begin.
Our first task is to ensure we have enough power to begin the Process. So lets deploy a Generator. Click one of the Green blocks on your Settlement Overview Screen and deploy a Cygnus Power Generator V1.
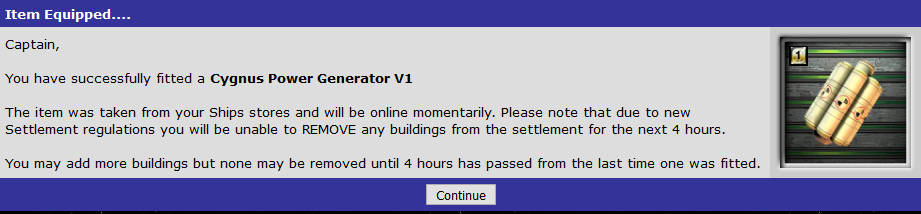
Fitting items to your Settlement is easy as long as you have sufficient energy reserves and if that building requires specialised staff enough of those already working on your settlement. Once deployed your top info bar will reflect the new changes. It does NOT matter where they buildings are located. So ANY vacant green section can be used.
20,000 energy (you had 5K from the settlement emergency supply) and also you will note your outgoings per day have gone UP by 1,000 credits.
![]()
OK now we have sufficient power we can fit a Housing Unit. I’m doing this in order to better explain the process. But you could simply deploy BOTH of the two Generators we said to go collect. But for continuity lets now deploy a Settlement Housing Unit 1.
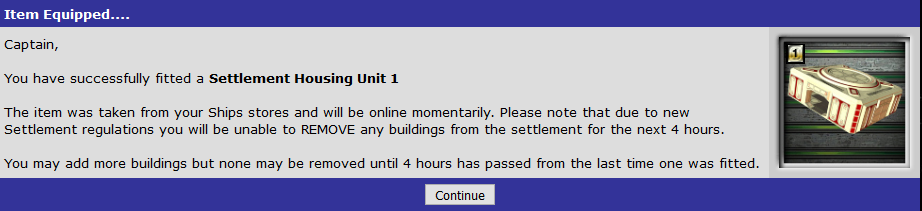
Now we can see that our housing unit has added an extra 10 spaces for staff. We can also see its taken energy from our reserves and added an extra 750 credits per day to our outgoings.
![]()
Lets invite some of the staff we hired to come live and work on our settlement shall we. From the bottom blue icon bar you will see I have highlighted the Settlement Staff Button. Lets find that and click it.

Now this screen enables us to Transfer staff to work AT the Settlement (up to the maximum staff space) and also transfer staff away from the settlement effectively placing them on paid leave.
I’m going to Transfer Fifteen of my staff to the settlement. This is the max we can have with a single housing unit at this stage.
Did you manage that. You should have maxed out your Staffing (as shown on the blue top info bar). If so now lets add Another Cygnus Power Generator V1 and then Another Settlement Housing Unit 1.
This brings our possible maximum staffing level up to 25. Now remember I said that I hired 20 Staff ? Well if you did the same go ahead and transfer over the remaining staff bringing you up to Twenty Staff.
Level Two Message
When you transfer over your ‘Twentieth‘ staff member your settlement will automatically move to Level Two.
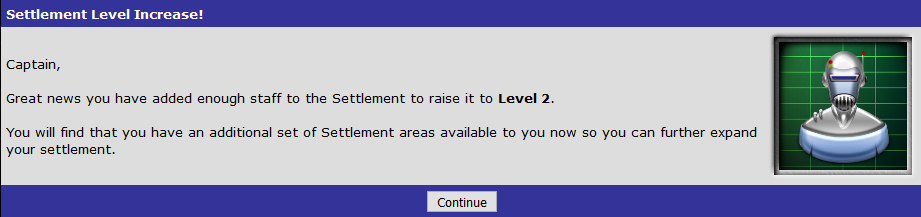
Level Two is the only one that is activated (reached) by ONLY adding staff. From here on in you will have a series of goals to reach before leveling to the next level.
Time to kick off Research
We have sufficient remaining power now to deploy a final building that will kick start our settlement. A Research Laboratory.
So lets deploy a Research Laboratory. Again this will require power so you are going to be close to maxed out by deploying this building. But it will kick start your Settlement Research.
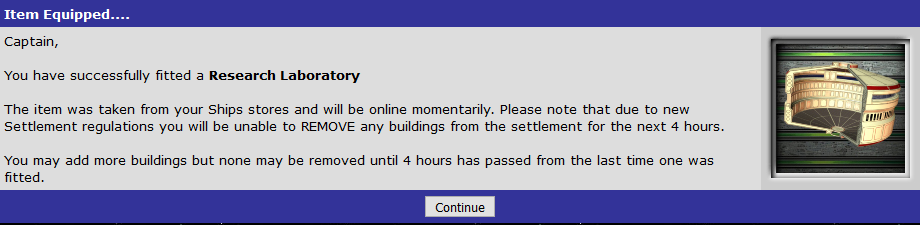
Research buildings create Settlement Research Points (S.R.P). This is created once per day and added to your Settlements SRP pool. Depending on when you deployed your settlement you may have to wait for your initial SRP to roll in.
Lets Take a Look
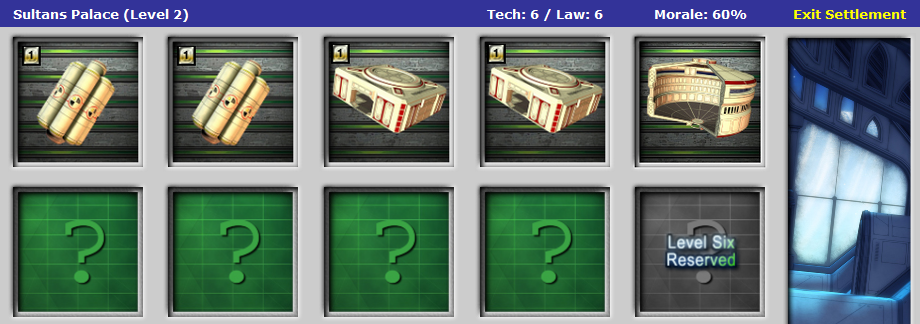
Having deployed 2 Generators, 2 Housing units and 1 Research Facility and leveling to Level 2 by transferring 20 staff to the settlement your settlement should look something like this :
![]()
Our Settlement info bar at the top of the screen should be showing 20(25) staff, 1,000 units of reserve energy and 4,500 credit daily outgoing costs.
Research Department: OK lets take a closer look at the research department. You can access it from the bottom icon bar. i have highlighted the icon. Click that and enter the screen.

Now there is a lot to look at here and over time this screen will grow with more options as you level up your settlement. This set up guide is not here to ‘tell’ you what to spend your SRP on. But I will suggest that you raise your Tech level. This will influence any stores you place on your settlement.
You may also want to consider Commercial Contract research. This will increase the amount of offices you can open on your settlement. the more you have the more inviting the settlement to visitors.
You can review these options by clicking the More Info button. You will also see the SRP cost.
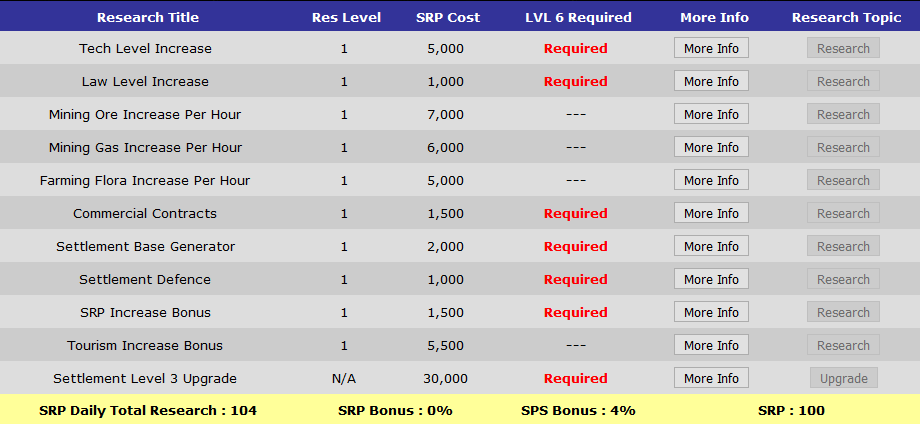
Above we can see the SRP Daily Total Research, this includes any bonuses applied like that by your Staff S.P.S also if you have an SRP Account Booster active. Any SRP created each day by your Settlement is added to the pool displayed on the far right.
OK this guide is now complete. We have talked you through deploying sufficient buildings and adding sufficient staff to level to Level 2. Level three requires the following to be met :
SRP : 30,000
Settlement Level : 2
Resident Staff : 35
Settlement HP 10,000+
Your going to have to sit and ponder what you want to do first with your settlement, but don’t be in a blinding rush. Take your time talk to other settlement owners. Figure out if their way is the right way for you and move forward.
you might like to Read a Wiki Settlement Guide written by the players. The guide is kept reasonably up to date by players but is not an official guide.
Why not read the next Guide on Adding ‘Commercial Contracts’ (opening Offices) on your Settlement.
Few Foot Notes:
Always check the info on buildings before buying or crafting when getting them for your Settlement. Don’t get caught out by a power requirement, level requirement or simply that the building needs staff type X that you don’t have.
Building Limits:
You can ONLY deploy a Maximum of THREE Power Generating buildings at any one time.
You can ONLY deploy a Maximum of FOUR Housing buildings at any one time.
You can ONLY deploy a Maximum of THREE Research buildings at any one time.
Building Lockouts:
When placing a building on to your settlement load out screen you are activating a FOUR Hour lockout. This stops you from removing ANY building from your settlement for four hours. You may deploy as many in a row as you wish but from the last deployment you cannot remove any building for Four hours.
This means planning ahead and getting your deployments and removals all lined up before ‘willy nilly’ adding buildings then realising you want to pull them.
With Settlements Prior Preparation Prevents Poor Performance : Remember the Five P‘s 🙂